
Warning: How to Properly Redirect to HTTPS for WordPress
Do you want WordPress to redirect to HTTPS? This guide is made for you. It will teach you everything you need to know to make WordPress redirect to HTTPS and also mitigate further issues you may face.
Also, while there are many redirection code snippets on the web, some of them are actually dramatic and shouldn’t be used. In this guide, you’ll find SEO Battletested code snippets that will not harm your website rankings.
Google made it clear that SSL is what they want for the web, it is also a crucial SEO factor.
The HTTPS protocol works with an asymetrical encrypted key which set an handshake between your browsers and the web server. It allows to authentify a visitor session and protect him from a man in the middle type of attack.
Enabling a SSL certificate for the website will bring its load of benefits such as
- Increased Website Security
- Reduce the Bounce Rate
- Increase the Sales Conversion
- Boost of Rankings in SERPS
Once your SSL certificate is installed, there are there are a few extra steps to make WordPress redirect to HTTPS properly and without any issue.
A SSL certificate requires all your content to be served through HTTPS to avoid a mixed content SSL error. WordPress will automatically serve the elements in https of your website such as:
- Videos / Images / Audio
- JS Assets (Adsense, Facebook Tracking Pixel, Adwords, Google Tag Manager, Analytics, Jquery Libraries etc..)
- CSS Assets
- Web Fonts
Also, your internet net linking should be referring to an https:// URL to avoid an unnecessary redirection.
Throughout this guide, we will teach you how to quickly make the change and verifications, force wordpress to load with HTTPS and the couple of extra steps required to make sure the swap is efficient.
I) How to Force WordPress to load through HTTPS ?
a. In WordPress redirect to HTTPS
The first step to do is to change the default URL of your WordPress website. It is a very powerful first step as all your images calls, pages links, posts links made through the WordPress Visual Editor would be redirected automatically to HTTPS without you having to correct it all.
So, you would need to go to your WordPress Admin dashboard and click on Settings, General and correct both of the input field by replacing http by https as shown in the screenshot below:

b. Force all the traffic to be redirected to the HTTPS version of your website.
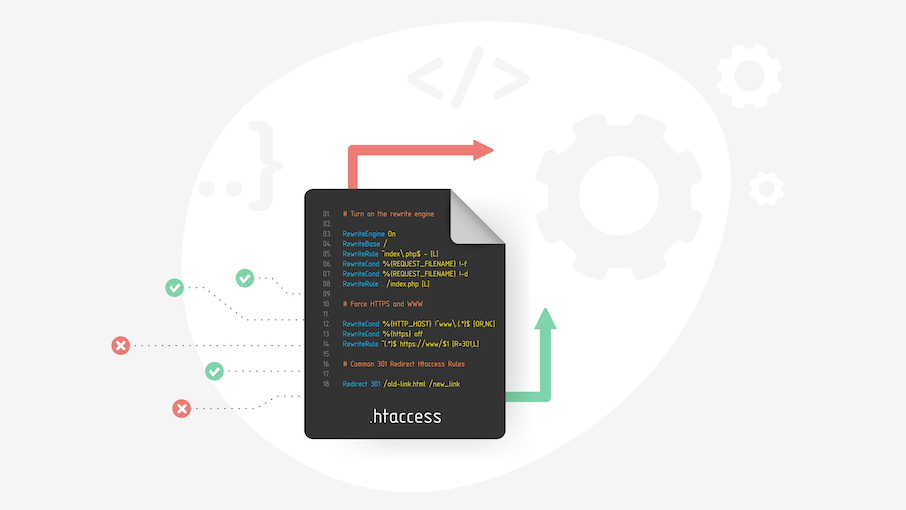
For all the traffic coming to your website, you would need to instruct the web server to exclusively serve your website content through HTTPS in which case. This steps goes through editing the .htaccess file of your website.
If you aren’t using cPanel, you would need to use a FTP client to access the files of your website and at the root of your wordpress folders you should see the .htaccess file.
If you are a customer of our services, you should have the cPanel access in which case, it will be more convenient and you would need to go to File Manager, click at the top right on Settings, tick display hidden files, go to the public_html directory and you will see your .htaccess file which you can select and edit.
On the web you’ll find a lot of htaccess snippets for this redirection but most of excludes some basic instructions which are required to optimise your SEO and instruct Google that it isn’t a fresh new website.
RewriteEngine on
RewriteCond %{HTTPS} !=on
RewriteRule .* https://%{HTTP_HOST}%{REQUEST_URI} [R=301,L]
It will instruct to apply the rewriting rules only for http calls to your website and also give the signal it is a 301 redirection which would keep all the off site SEO efforts you already benefit from. This step will make sure that WordPress redirect to https.
The previous snippet has been tested on all our lines of services and is working properly. However, should you face the slightest issue, it means your provider uses a different tech stacks, you may find some further .htaccess instruction that will do the https redirection properly:
RewriteEngine on
RewriteCond %{SERVER_PORT} 80
RewriteRule .* https://%{HTTP_HOST}%{REQUEST_URI} [R=301,L]
RewriteEngine on
RewriteCond %{REQUEST_SCHEME} =http
RewriteRule .* https://%{HTTP_HOST}%{REQUEST_URI} [R=301,L]
RewriteEngine on
RewriteRule .* http://%{HTTP_HOST}%{REQUEST_URI} [R=301,L]
II) How to Fix the Mixed Content Warning on WordPress?
a. Fix Automatically the Mixed Content Warning
This is the most common issue you can face when enabling a SSL certificate and the HTTPS protocol.
The reason was stated earlier and you would need to replace all http:// calls you make throughout the whole website. Fortunately, there is a plugin for that.
You punctually install this plugin to search and replace as all the content you are after is located in your MySQL database.
Once, you have installed the plugin you would need to go to its interface and search the string http:// and replace it with https://.
b. Test your website HTTPS and seek for errors
Once, you have replaced all the iterations of http on all your website you shouldn’t have the Mixed Content Warning. Yet, if you still face the error, it could be because of an inclusion you did before. But you may refer to this page in order to crawl and scan your website for any SSL related errors:
https://www.jitbit.com/sslcheck/
For the custom inclusion you may hard coded in your theme, you would need to alter it from the WordPress Code Editor (Menu Appearance / Editor). Please use this editor wisely and always perform a full backup before altering it as you could risk to break your website.
III) Enhance the SEO impact of the SSL installation
Now it is time to make sure you aren’t loosing your SEO juice, and optimise the whole.
You may experience a temporary set back in the search engines but it is only temporary since you have performed a 301 redirection and the following steps will also insure that Google is made aware of the change.
Since, you changed your URL structure, the search engines will see it as a new website. Therefore, you would need to perform these easy steps to maximise the return of the operation
- Create a new property in the Google Webmaster Tools and Bing Webmaster Tools
- Send your Website Sitemap to both and update it on your website
- Update the website property in Google Analytics if you are using it. (Admin -> Property Settings -> Default URL)
- Transfer your Social Share Counts to your website using the following WordPress plugins.
Let’s Wrap it Up!
You have learned how to make WordPress redirect to HTTPS. This guide was exhaustive and could be a lot digest but it will make sure you aren’t facing the slightest issue to benefit from a fairly easy SEO factor to increase your website success.
Of course, before diving in such operation, it is important to perform a full website backup.
If you are one of our customer, you would need to go to cPanel and generate your backup in 2 clicks.
Your current host isn’t including FREE SSL ? Try our shared web hosting packages and issue SSLs for free for all your websites
You want the green bar for your website! Get an Extended Validation SSL for your business with $10 immediate discount using this coupon: EV4WP.


mostbet gandbol stavka [url=http://mostbet82059.help]mostbet gandbol stavka[/url]
pin-up halolmi [url=www.pinup87630.help]pin-up halolmi[/url]
реабилитационный центр для наркозависимых [url=https://vyvod-iz-zapoya-v-staczionare-sankt-peterburg-2.ru/]vyvod-iz-zapoya-v-staczionare-sankt-peterburg-2.ru[/url] .
капельница от похмелья [url=https://vyvod-iz-zapoya-v-staczionare-sankt-peterburg-3.ru/]vyvod-iz-zapoya-v-staczionare-sankt-peterburg-3.ru[/url] .