
If your broadcast loops a finished video, shutting down the studio PC should not take it off air. An FFmpeg streaming VPS can replay that file and send it to the platform while OBS is closed. If someone still needs to switch cameras or mix the show live, keep OBS at the studio.
This guide builds a single outbound relay on Ubuntu 24.04 LTS. You will check the input, choose whether to encode it once, and rehearse a restart against a private broadcast before enabling the service at boot. For a loop, size the outgoing connection first; buying more cores does little for a feed that already meets the destination’s requirements.
Choose where production ends and the relay begins
A local camera belongs to the machine it is plugged into. Renting a VPS does not move that capture device into the data center. For a live show, mix the sources locally and send one contribution feed; for the prerecorded job below, transfer the file once and leave the studio machine out of the running system.
| Job | Use | Check first |
|---|---|---|
| Switch scenes live | OBS at the studio | Camera, microphone and preview |
| Loop a compatible file | FFmpeg stream copy on the VPS | Accepted video, audio and keyframe interval |
| Change the picture or codec | Encode the file before relaying it | Output quality and available storage |
In FFmpeg stream copy, packets move to the output without decoding and re-encoding the selected streams. Scaling, overlays and frame-rate conversion require a video encode. There is no general CPU saving you can quote for FFmpeg versus OBS without specifying both workloads. See the FFmpeg and OBS comparison for the production choice.
Budget the outgoing video bitrate
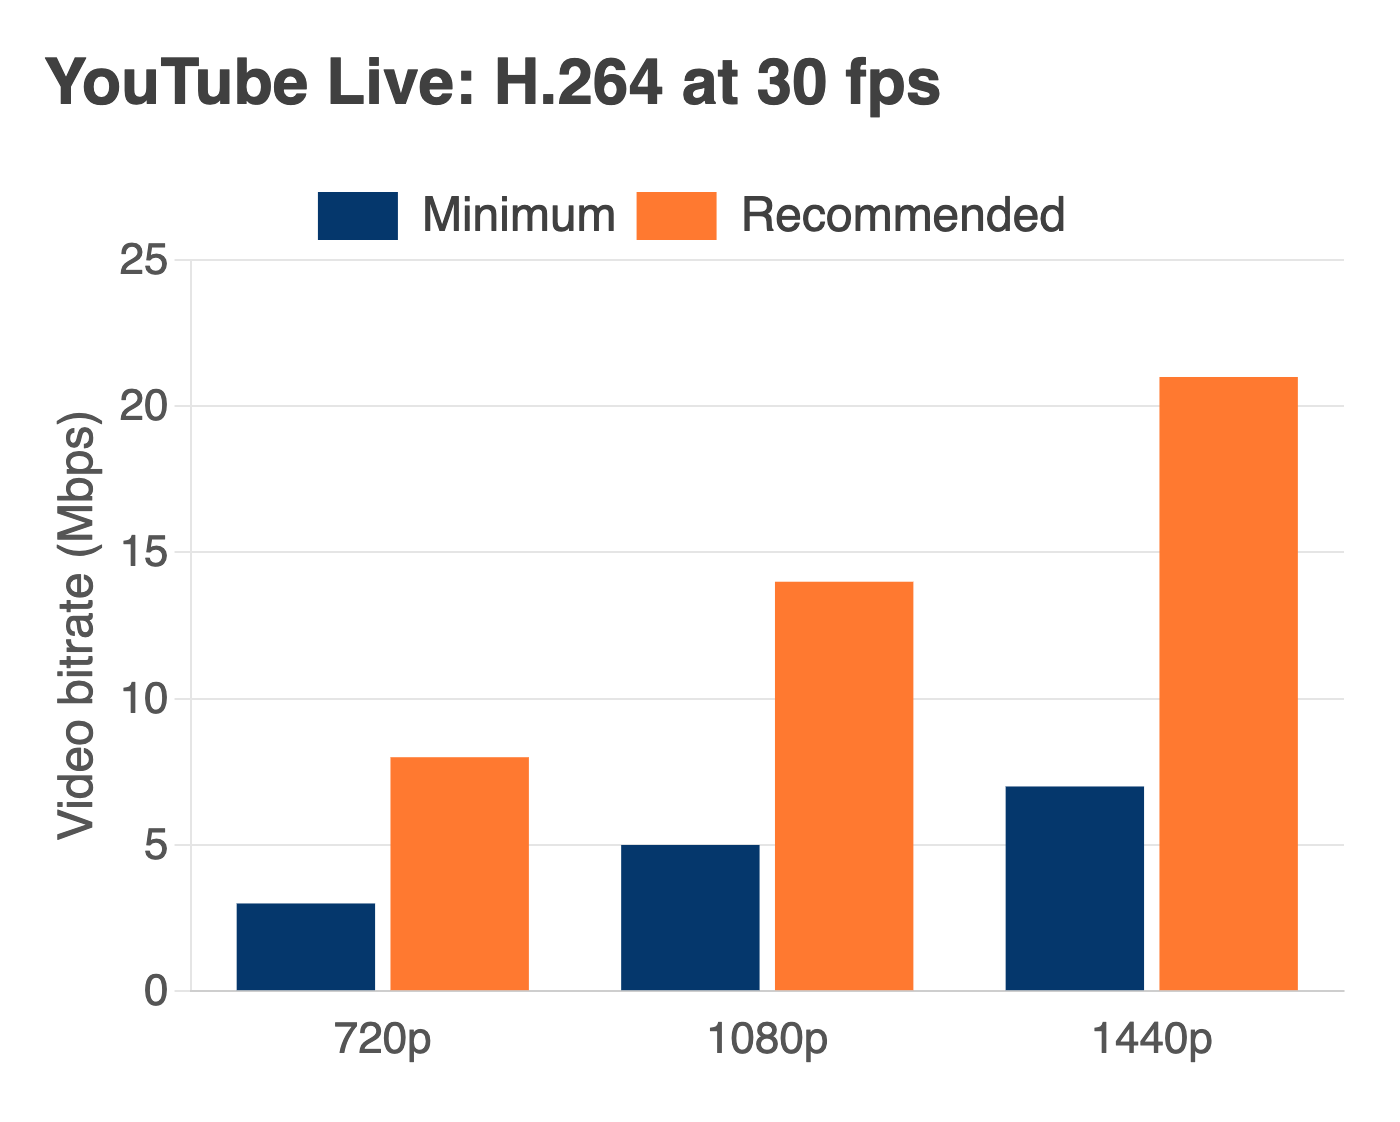
The VPS sends one feed per destination, not one per viewer when a platform distributes the broadcast. Pick the platform, codec and frame rate first. For example, YouTube’s recommended H.264 setting at 30 fps rises from 8 Mbps at 720p to 14 Mbps at 1080p. The minimum is a separate setting, not extra bandwidth to add.
| 30 fps | Minimum (Mbps) | Recommended (Mbps) |
|---|---|---|
| 720p | 3 | 8 |
| 1080p | 5 | 14 |
| 1440p | 7 | 21 |
YouTube Live encoder settings. YouTube Live guidance, checked 16 November 2026: H.264 video at 30 fps, in Mbps. Audio and transport overhead are additional.
For two separate outputs configured at 8 Mbps video and 128 kbps stereo audio each, the calculated payload is 2 × (8 + 0.128) = 16.256 Mbps, before protocol overhead. Leave headroom and check the actual route to each ingest endpoint. This is a planning example, not a measurement or a promised stream count.
Install FFmpeg and inspect the source
Use a VPS where you have administrative access. Start with a short, rights-cleared SDR clip containing one 16:9 video track and one stereo audio track. The examples expect the file as input.mp4 in your working directory. On a fresh host, install Ubuntu’s FFmpeg package and create a service account that can read, but cannot replace, the media.
sudo apt update
sudo apt install ffmpeg
sudo adduser --system --group --no-create-home streamer
sudo install -d -o root -g streamer -m 0750 /srv/stream
sudo install -o root -g streamer -m 0640 ./input.mp4 /srv/stream/input.mp4
Inspect both the installed build and the file. Look for the libx264 and AAC encoders and RTMPS in the output protocols. Read the video and audio stream entries separately. If the source has no audio, multiple languages, interlacing or HDR, stop here and adapt the mapping and conversion for that material.
ffmpeg -version
ffmpeg -hide_banner -encoders
ffmpeg -hide_banner -protocols
sudo -u streamer ffprobe -v error -show_entries \
  stream=index,codec_type,codec_name,width,height,avg_frame_rate:format=duration \
  -of json /srv/stream/input.mp4
Test stream copy before spending CPU on encoding
On the machine holding your working copy, try remuxing 30 seconds to a new FLV file. The explicit maps pick the first video and first audio track. Play the output and listen to both channels. A successful local mux shows the streams fit that container; only the destination can confirm its codec, bitrate and keyframe policies.
ffmpeg -hide_banner -n -i ./input.mp4 -t 30 \
  -map 0:v:0 -map 0:a:0 -c copy -f flv ./copy-test.flv
ffprobe -v error -show_entries stream=codec_type,codec_name \
  -of compact ./copy-test.flv
If the original packet streams are already acceptable, the relay script below can read /srv/stream/input.mp4 directly: change just the input path and skip the conversion and staging commands. If you need a different resolution or GOP, encode the finished loop once. The next example assumes progressive 16:9 SDR input; other aspect ratios need padding or a different scale to avoid stretching. It creates a new 720p30 H.264/AAC file for the YouTube example.
ffmpeg -hide_banner -n -i ./input.mp4 \
  -map 0:v:0 -map 0:a:0 -vf "scale=1280:720,fps=30" \
  -c:v libx264 -preset veryfast -pix_fmt yuv420p \
  -b:v 8M -minrate 8M -maxrate 8M -bufsize 16M \
  -x264-params "nal-hrd=cbr" -g 60 -sc_threshold 0 \
  -c:a aac -b:a 128k -ar 44100 -ac 2 \
  -f mpegts ./ready.ts
The 60-frame maximum GOP corresponds to two seconds at 30 fps. The video rate controls and encoder padding target a constant rate; they do not make the entire network stream exactly 8 Mbps. The pace of this offline conversion is useful when planning preparation time. It is independent of the speed of the later stream-copy relay. Copy the completed file into the service directory and verify the service user can read it.
sudo install -o root -g streamer -m 0640 ./ready.ts /srv/stream/ready.ts
sudo -u streamer ffprobe -v error -show_entries stream=codec_type,codec_name \
  -of compact /srv/stream/ready.ts
Keep the relay running after logout
Create a private test broadcast in the destination account. In the editor opened below, enter only its complete RTMPS ingest URL, including the key, on one line. Do not paste the key into a command, ticket or screenshot. The unit uses systemd credentials to give the running service access to that file.
sudo install -d -o root -g root -m 0700 /etc/ffmpeg-relay
sudoedit /etc/ffmpeg-relay/destination
sudo chmod 0600 /etc/ffmpeg-relay/destination
Save the following launcher as ffmpeg-relay in your working directory. The pacing and infinite loop options apply to the file input. Run only one copy per stream key. FFmpeg receives the destination as a process argument: a credential file protects it in storage, but does not hide it from privileged process inspection. Use a trusted VPS with restricted shell access. Do not share process listings or enable verbose reports that may include the URL.
#!/bin/sh
set -eu
destination=$(cat "$CREDENTIALS_DIRECTORY/destination")
case "$destination" in
  rtmps://*) ;;
  *) exit 64 ;;
esac
exec /usr/bin/ffmpeg -nostdin -hide_banner -loglevel quiet \
  -stats_period 10 -progress pipe:1 -re -stream_loop -1 \
  -i /srv/stream/ready.ts -map 0:v:0 -map 0:a:0 \
  -c copy -f flv "$destination"
Save the next block as ffmpeg-relay.service. The unit retries a failed process with a delay and limits repeated starts. The network target controls ordering, not remote ingest availability. Only periodic progress goes to the journal here; the launcher suppresses detailed output that might disclose the destination. Inspect a non-secret local test separately if you need verbose diagnostics.
[Unit]
Description=FFmpeg prerecorded relay
Wants=network-online.target
After=network-online.target
StartLimitIntervalSec=120
StartLimitBurst=4

[Service]
Type=exec
User=streamer
Group=streamer
LoadCredential=destination:/etc/ffmpeg-relay/destination
ExecStart=/usr/local/bin/ffmpeg-relay
Restart=on-failure
RestartSec=10s
StandardOutput=journal
StandardError=null
NoNewPrivileges=yes
PrivateTmp=yes
ProtectSystem=strict
ProtectHome=yes

[Install]
WantedBy=multi-user.target
Install both files, verify that systemd can read the unit, and start it for the private test. Starting it at this point does not enable it at boot.
sudo install -o root -g root -m 0755 ./ffmpeg-relay /usr/local/bin/ffmpeg-relay
sudo install -o root -g root -m 0644 ./ffmpeg-relay.service /etc/systemd/system/ffmpeg-relay.service
sudo systemd-analyze verify /etc/systemd/system/ffmpeg-relay.service
sudo systemctl daemon-reload
sudo systemctl start ffmpeg-relay.service
Check the receiver before enabling automatic startup
A running process is not proof of a watchable stream. At the destination, check motion, audio, continuity across the end of the loop and the ingest health indicator. On the VPS, look for advancing output time across several progress reports. A paced file normally stays near 1×; that number alone says nothing about spare CPU.
systemctl is-active ffmpeg-relay.service
systemctl show ffmpeg-relay.service -p NRestarts -p Result
sudo journalctl -u ffmpeg-relay.service --since "5 minutes ago" --no-pager
Test a deliberate service restart while the destination is still private. Watch how long its preview drops and whether it comes back with sound. If starts repeatedly fail, stop the unit, correct the credential, file permissions or ingest settings, and reset the failed state before restarting. If local output advances but the preview does not, investigate the endpoint and platform event before adding CPU.
Enable startup only after the private rehearsal succeeds. Rehearse a reboot in a maintenance window before relying on the loop unattended. Monitor the receiver independently and alert on a stalled feed, not merely on the existence of a process.
sudo systemctl enable ffmpeg-relay.service
To stop the current feed deliberately:
sudo systemctl stop ffmpeg-relay.service
Frequently asked questions
Should I keep OBS open to run a prerecorded loop?
No. Once the VPS has the file and the relay is running, it does not use the studio PC. Keep OBS when a person needs to switch scenes or the source is a device attached to the studio machine.
Do I need to open an inbound RTMP port?
Not for this outbound file relay. The VPS initiates its RTMPS connection to the platform. Receiving a live contribution on the VPS would be a different design with its own listener and access controls.
How do I tell whether the VPS is too small?
First distinguish encoding from copying. For a live encode, test the actual filters, preset and resolution without file pacing in a separate offline rehearsal. For a copied feed, check timestamp continuity, available egress and destination health before assuming CPU is the limit.
Will an automatic restart recover an expired stream key?
No. Correct or rotate the credential, restart the unit so it receives the replacement, and verify the new feed in the destination preview. The retry limit prevents a bad configuration from restarting indefinitely.
What if the source plays locally but the platform rejects it?
Compare its codec, audio track, frame rate and keyframe interval against that platform’s current requirements. A media player can decode files that a live ingest endpoint will not accept. Try the prepared H.264/AAC output privately before you replace the production loop.